First of all we would like to wish you all a Happy New Year as this is our first post of the year. Before we get asked again, no we didn’t make any new year resolutions. Over the Holidays we worked hard by making good headway into our stock take. As yet we haven’t finished it all as we need yet more space. The stock levels are pretty accurate compared to the online ordering system. The only thing is that we found lots more stuff we had forgotten about and not as yet on the WebShop, we have stored those lost parts in our new custom-made area, which was another job we hadn’t planned on at the end of last year. The new year for us is nothing different from the old year, the cars we had a couple of weeks ago are still there in the same state that we left them. So let’s get on with the updates for you.
Customers Cars:
We have a 1963 Ford Falcon Sedan Delivery 144CiD three on a tree, which required a little work in order for her to be ready for her MOT so she can get back on the road. As the car has sat in and around the yard nearly for three years we finally got the go ahead to work on her. This is rare example and you certainly don’t see many of them around now days.


The brake rear cylinders had corroded and leaked so needed to be changed as the first job, followed by a full brake adjust and bleed. The engine didn’t run very well at all when she arrived and we narrowed it down to the worn carb. First up was a new battery to turn the car over. We replaced the old carb with an Autolite part and fired her up. She started well and we could check for other issues, the most obvious now being the exhaust manifold blowing.


This was replaced easy enough without breaking any bolts which was a big bonus on a job like this. After she was put back together we could do a preliminary carb air/fuel setup ready for a road test.

We checked under the car and found that the rear exhaust had been “repaired” a few times before. It’s certainly not pretty, but it’s still holding up, for now.


The road test was great for the brakes and manifold, but wasn’t so good for the erratic engine running. We suspect that the car just needs to settle down again, it could even be simply a gone off batch of fuel. We will need to go over the fuel, throttle travel, idle, full timing & mixture settings to make her run right again. It’s not far away, just not how we want it to run. A few more miles on her first after the laid up spell before we adjust anything to much at this point.
Chris’ Mustang Project.
Chris has been working hard over the Christmas break to get the front of his car ready for some new metal and prep what he has to protect it from the elements. We see the inside of the engine has been completed and looks good now with the coats of Red Oxide.


Work has started on the upper cowl and B pillar areas.


Other News:
We have been sent a video of the differences between the USA and European spec Mustangs. I looks like we are definitely getting a raw deal in the UK! Hope you enjoy the video, not sure where it’s come from, but its a good video.
DeAgostini Shelby 1:8th Model Update
We had a delivery between Christmas and the New Year so we done a little indoor car building. The issues are 53 – 56 and have been updated on the build model page we are doing, also on the main menu, or click here for the link.
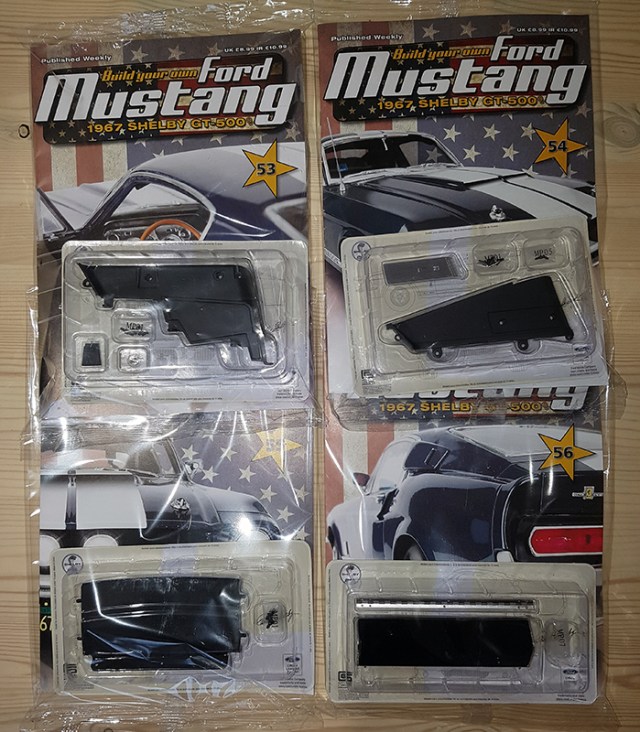
Part 53:
We continue with the inside theme with the first of the rear trim sections which comes in two parts, this being the first. There are two simple parts to screw to the trim, the courtesy light and the latch. With those in place a further three screws holds it onto the floor pan we have been building up over the last few issues.


Part 54:
This issue has the upper part to be attached to the previous lower section. The trim is a single piece with three screws to the rear, of which one is a lot smaller than the other two towards the front of the trim.


Part 55:
This was a single piece to be fitted to the left rear trim and under the rear floor pan. You can see that part has rounded fittings which push into the both the upper and lower parts of the rear trim. We were frustrated here as the parts didn’t align correctly and took a little bending to push them into the holes. Once they were in place a simple three screws to hold it firmly at the underside of the floor pan.
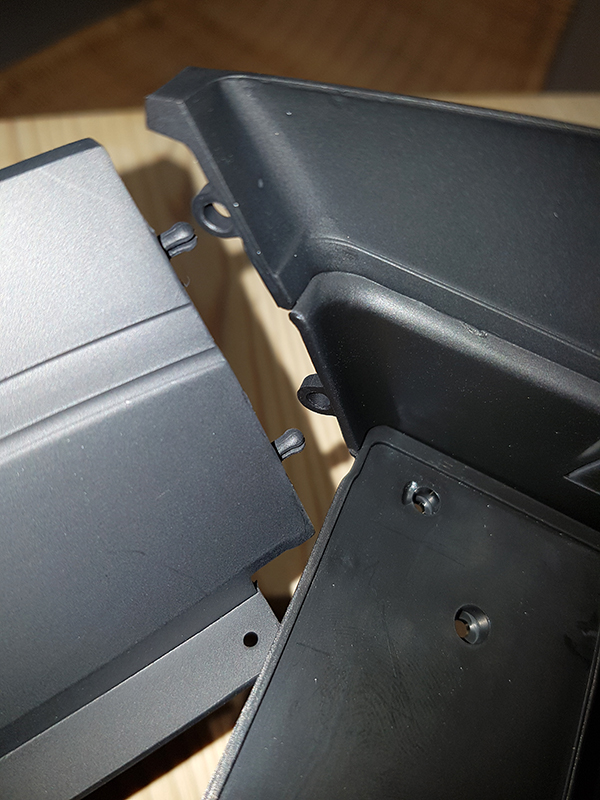
Part 56:
This part we liked a lot. The fold down shelf has a hinge and this is replicated in metal with very nice detail. There are chrome coloured screws to match the metal hinge which is located by a very slightly of set centre screw and will only fit one way. Once the hinge has been screwed on there is nowhere to attach it at the moment. These hinge screws are really tiny and we hope you have a nice set of screw drivers to cope. We found that our magnetised smaller driver fitted perfectly and made life a lot easier to attach the hinge.


A big thanks to everybody who has emailed us to say they enjoyed the Las Vegas / SEMA trip from last year. It seems as though you enjoyed it as much as we did. We take on board that there was a lot of pictures, but we think it was worth the larger posts. One final note – in these cold weather spells make sure you check your anti-freeze!


Nice repair on that exhaust. 😲
LikeLiked by 2 people
It’s different that’s for sure.
LikeLiked by 1 person